Pipets : Overview, Uses, Function, Cleaning

Pipets
– Pipets permit the transfer of accurately known volumes from one container to another.
– Common types are shown in Figure (1), and information concerning their use is given in Table (1).
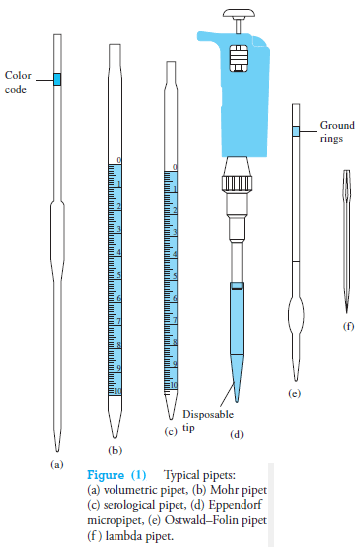

– A volumetric, or transfer, pipet (Figure 1a) delivers a single, fixed volume between 0.5 and 200 mL.
– Many such pipets are color-coded by volume for convenience in identification and sorting.
– Measuring pipets (Figures 1b and c) are calibrated in convenient units to permit delivery of any volume up to a maximum capacity ranging from 0.1 to 25 mL.
– All volumetric and measuring pipets are first filled to a calibration mark, but how the transfer is completed depends on the particular type.
– Because most liquids are attracted to glass, a small amount of liquid tends to remain in the tip after the pipet is emptied.
– This residual liquid is never blown out of a volumetric pipet or from some measuring pipets, but it is blown out of other types of pipets (see Table 1).
Eppendorf micro pipets
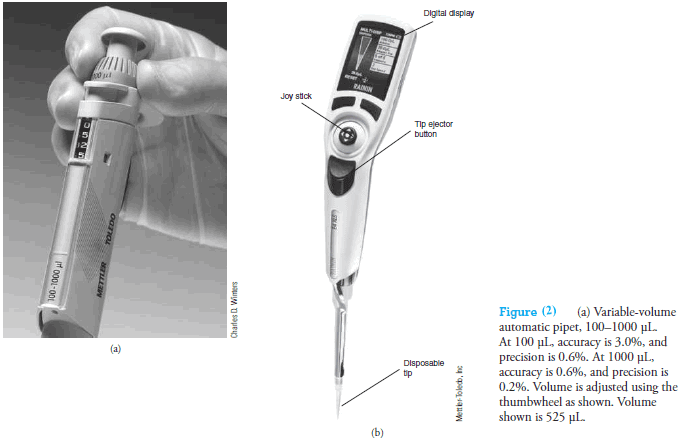
– Handheld Eppendorf micro pipets (see Figure 1d and Figure 2a) deliver adjustable microliter volumes of liquid.
– With these pipets, a known and adjustable volume of air is displaced from the plastic disposable tip by depressing the pushbutton on the top of the pipet to a first stop.
– This button operates a springloaded piston that forces air out of the pipet.
– The volume of displaced air can be varied by a locking digital micrometer adjustment located on the front or top of the device.
– The plastic tip is then inserted into the liquid, and the pressure on the button is released, causing the liquid to be drawn into the tip.
– The tip is then placed against the walls of the receiving vessel, and the pushbutton is again depressed to the first stop.
– After 1 second, the pushbutton is depressed further to a second stop, which completely empties the tip.
– The range of volumes and precision of typical pipets of this type are shown in the margin.
– The accuracy and precision of automatic pipets depend somewhat on the skill and experience of the operators and thus should be calibrated for critical work.
– Numerous automatic pipets are available for situations that call for the repeated delivery of a particular volume.
– In addition, motorized, computer-controlled microliter pipets are now available (see Figure 2b).
– These devices are programmed to function as pipets, dispensers of multiple volumes, burets, and sample dilutors.
– The volume desired is entered using a joystick and buttons and is displayed on an LCD panel.
– A motor-driven piston dispenses the liquid.
– Maximum volumes range from 10 µL to 20 mL.
Directions for Using a Pipet
– The following directions are appropriate specifically for volumetric pipets but can be modified for the use of other types as well.
– The liquid is drawn into a pipet through the application of a slight vacuum.
– Never pipet by mouth because there is the risk of accidentally ingesting the liquid being pipetted.
– Instead, use a rubber suction bulb (such as the one shown at the top of the next page) or one of some similar, commercially available devices.
– Many devices are commercially available for filling pipets and dispensing liquids from them.
– The device shown here is offered by many suppliers and manufacturers.
– Originally called the Propipette®, it is a very handy device for the task.
– The Propipette consists of a rubber bulb (B) attached to three short sections of tubing.
– Each section of tubing contains a small chemically inert ball (A, C, and D) that functions as a valve to permit air to flow normally in the directions indicated by the arrows.
– The valves are opened by pinching with your thumb and forefinger.
– The bottom of the device fits snugly on the top of a pipet.
– Operation begins by opening valve A an squeezing bulb B to expel the air in the bulb.
– Valve A is then closed, and valve C is opened to draw liquid into the pipet to the desired level, after which C is closed.
– The liquid level is then adjusted in the pipet by carefully opening valve D, and finally, the liquid in the pipet is delivered by opening valve D completely.

Cleaning
(1) Draw the detergent solution to a level 2 to 3 cm above the calibration mark of the pipet.
(2) Drain this solution and then rinse the pipet with several portions of tap water.
(3) Inspect for film breaks, and repeat this portion of the cleaning cycle if necessary.
(4) Finally, fill the pipet with distilled water to perhaps one-third of its capacity and carefully rotate it so that the entire interior surface is wetted.
(5) Repeat this rinsing step at least twice.
Measuring an Aliquot

(1) Draw a small volume of the liquid to be sampled into the pipet (Figure 3a).
(2) thoroughly wet the entire interior surface (Figure 3b).
(3) Repeat with at least two additional portions.
(4) Then carefully fill the pipet to a level somewhat above the graduation mark.
– Be sure that there are no bubbles in the bulk of the liquid or foam at the surface.
(5) Touch the tip of the pipet to the wall of a glass vessel as shown in Figure 3c (not the container into which the aliquot is to be transferred),
(6) slowly allow the liquid level to drop.
– As the bottom of the meniscus coincides exactly with the graduation mark (Figure 3d), stop the flow.
(7) Remove the pipet from the volumetric flask, tilt it until liquid is drawn slightly up into the pipet, and wipe the tip with a lintless tissue as shown in Figure 3e.
(8) Then place the pipet tip well within the receiving vessel, and allow the liquid to drain (Figure 5f ).
(9) When free flow ceases, rest the tip against the inner wall of the receiver for a full 10 seconds (Figure 3g, h).
(10) Finally, withdraw the pipet with a rotating motion to remove any liquid adhering to the tip.
– The small volume remaining inside the tip of a volumetric pipet should not be blown or rinsed into the receiving vessel.
(11) Rinse the pipet thoroughly after use.