Volumetric Flask: Overview, Uses, Function
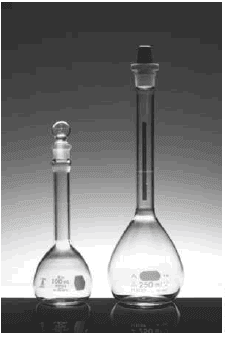
Volumetric Flask
– A volumetric flask is manufactured with capacities ranging from 5 mL to 5 L and is usually calibrated to contain (TC) a specified volume when filled to a line etched on the neck.
– They are used for the preparation of standard solutions and the dilution of samples to a fixed volume before taking aliquots with a pipet.
– Some are also calibrated on a to-deliver (TD) basis, and they are distinguished by two reference lines on the neck.
– If delivery of the stated volume is desired, the flask is filled to the upper line.
Directions for Using a Volumetric Flask
– Before being put into use, volumetric flasks should be washed with detergent and thoroughly rinsed.
– Only rarely do they need to be dried.
– If required, however, drying is best accomplished by clamping the flask in an inverted position.
– Insertion of a glass tube connected to a vacuum line hastens the process.
(1) Direct Weighing into a Volumetric Flask
– The direct preparation of a standard solution requires the introduction of a known mass of solute to a volumetric flask.
– The use of a powder funnel minimizes the possibility of losing solids during the transfer.
– Rinse the funnel thoroughly, and collect the washings in the flask.
– The foregoing procedure may be inappropriate if heating is needed to dissolve the solute.
– Instead, weigh the solid into a beaker or flask, and add solvent.
– Heat to dissolve the solute.
– Allow the solution to cool to room temperature.
– Transfer this solution quantitatively to the volumetric flask, as described in the next section.
(2) Quantitative Transfer of Liquid to a Volumetric Flask
(1) Insert a funnel into the neck of the volumetric flask.
(2) use a stirring rod to direct the flow of liquid from the beaker into the funnel.
(3) With the stirring rod, tip off the last drop of liquid on the spout of the beaker.
(4) Rinse both the stirring rod and the interior of the beaker with distilled water and transfer the washings to the volumetric flask as before.
(5) Repeat the rinsing process at least two more times.
(3) Diluting to the Mark
(1) After the solute has been transferred.
(2) fill the flask about half full and swirl the contents to hasten the solution.
(3) Add more solvent and again mix well.
(4) Bring the liquid level almost to the mark, and allow time for drainage (≈1 min).
(5) use a medicine dropper to make any necessary final additions of solvent (see Note below).
(6) Firmly stopper the flask, and invert it repeatedly to ensure thorough mixing.
(7) Transfer the contents to a storage bottle that either is dry or has been thoroughly rinsed with several small portions of the solution from the flask.
(4) Important Notes
– If, as sometimes happens, the liquid level accidentally exceeds the calibration mark, the solution can be saved by correcting for the excess volume.
– Use a selfstick label to mark the location of the meniscus.
– After the flask has been emptied, carefully refill it to the manufacturer’s etched mark with water.
– Use a buret to determine the additional volume needed to fill the flask so that the meniscus is at the gummed-label mark.
– This volume must be added to the nominal volume of the flask when calculating the concentration of the solution.