Calibration of Volumetric Glassware in the laboratory
– In this subject, we will discuss How to Calibrate Volumetric Glassware in the laboratory
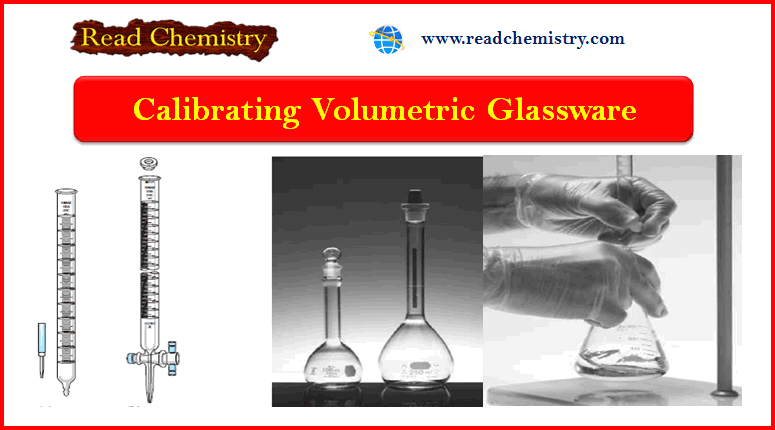
Calibration of Volumetric Glassware
– Volumetric glassware is calibrated by measuring the mass of a liquid (usually distilled or deionized water) of known density and temperature that is contained in (or delivered by) the volumetric ware.
– In carrying out a calibration, a buoyancy correction must be made since the density of water is quite different from that of the masses.
– The calculations associated with calibration are a bit time-consuming if done manually, but they can be automated in a spreadsheet so that they require a little more time than entering the data.
(1) The raw mass data are first corrected for buoyancy with the Equation:
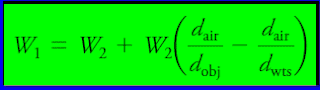
- W1 = is the corrected mass of the object.
- W2 = the mass of the standard masses.
- dobj = the density of the object.
- dwts = the density of the masses.
- dair = the density of the air displaced by masses and objects.
– The value of dair is 0.0012 g/cm3
(2) Next, the volume of the apparatus at the temperature of calibration (T) is obtained by dividing the density of the liquid at that temperature into the corrected mass.
(3) Finally, this volume is corrected to the standard temperature of 20°C.
Buoyancy Correction of Calibration of Volumetric Glassware
– Table (1) is provided to help with buoyancy calculations.
– Corrections for buoyancy with respect to stainless steel or brass mass (the density difference between the two is small enough to be neglected) and for the volume change of water and glass containers have been incorporated into these data.
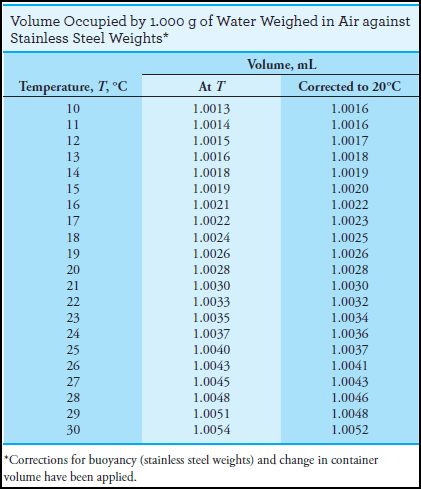
– Multiplication by the appropriate factor from the previous Table converts the mass of water at temperature T to (1) the corresponding volume at that temperature or (2) the volume at 20°C.
Solved Problem of Calibrating Volumetric Glassware in the laboratory
A 25-mL pipet delivers 24.976 g of water weighed against stainless steel mass at 25°C. Use the data in Table (1) to calculate the volume delivered by this pipet at 25°C and the volume if the weighing were carried out at 20°C.
Solution:

General Directions for Calibration
– All volumetric ware should be painstakingly freed of water breaks before being calibrated.
– Burets and pipets need not be dry, but volumetric flasks should be thoroughly drained and dried at room temperature.
– The water used for calibration should be in thermal equilibrium with its surroundings.
– This condition is best established by drawing the water well in advance, noting its temperature at frequent intervals, and waiting until no further changes occur.
– Although an analytical balance can be used for calibration, weighings to the nearest milligram are perfectly satisfactory for all but the very smallest volumes.
– Thus, a toploading balance is more convenient to use than an analytical balance.
– Weighing bottles or small, well-stoppered conical flasks can serve as receivers for the calibration liquid.
Calibration of a Volumetric Glassware (Volumetric Pipet)
(1) Determine the empty mass of the stoppered receiver to the nearest milligram.
(2) Transfer a portion of temperature-equilibrated water to the receiver with the pipet.
(3) weigh the receiver and its contents (again, to the nearest milligram).
(4) calculate the mass of water delivered from the difference in these masses.
(5) With the aid of Table (1), calculate the volume delivered.
(6) Repeat the calibration several times, and calculate the mean volume delivered and its standard deviation.
Calibration of a Buret
(1) Fill the buret with temperature-equilibrated water and make sure that no air bubbles are trapped in the tip.
(2) Allow about 1 minute for drainage, and then lower the liquid level to bring the bottom of the meniscus to the 0.00 mL mark.
(3) Touch the tip to the wall of a beaker to remove any adhering drop.
(4) Wait 10 minutes and recheck the volume.
– If the stopcock is tight, there should be no perceptible change.
(5) During this interval, weigh (to the nearest milligram) a 125 mL conical flask fitted with a rubber stopper.
(6) Once tightness of the stopcock has been established, slowly transfer (at about 10 mL/min) approximately 10 mL of water to the flask.
(7) Touch the tip to the wall of the flask.
(8) Wait 1 minute, record the volume that was apparently delivered, and refill the buret.
(9) Weigh the flask and its contents to the nearest milligram.
– The difference between this mass and the initial value is the mass of water delivered.
(10) Use Table (1) to convert this mass to the true volume.
(11) Subtract the apparent volume from the true volume.
– This difference is the correction that should be applied to the apparent volume to give the true volume.
(12) Repeat the calibration until agreement within 60.02 mL is achieved.
(13) Starting again from the zero mark, repeat the calibration, this time delivering about 20 mL to the receiver.
(14) Test the buret at 10-mL intervals over its entire volume.
(15) Prepare a plot of the correction to be applied as a function of volume delivered.
– The correction associated with any interval can be determined from this plot.
Calibration of a Volumetric Flask
(1) Weigh the clean, dry flask to the nearest milligram.
(2) fill to the mark with equilibrated water and reweigh.
(3) With the aid of Table (1), calculate the volume contained.
Calibration of a Volumetric Flask Relative to a Pipet
– The calibration of a volumetric flask relative to a pipet provides an excellent method for partitioning a sample into aliquots.
– These directions are for a 50-mL pipet and a 500-mL volumetric flask.
– Other combinations of volumes are equally convenient.
(1) Carefully transfer ten 50-mL aliquots from the pipet to a dry 500-mL volumetric flask.
(2) Mark the location of the meniscus with a gummed label.
(3) Cover with a label varnish to ensure permanence.
(4) Dilution to the label mark permits the same pipet to deliver precisely a one-tenth aliquot of the solution in the flask.
– Note that recalibration is necessary if another pipet is used.
Reference: Fundamentals of analytical chemistry / Douglas A. Skoog, Donald M. West, F. James Holler, Stanley R. Crouch. (ninth edition) , 2014 . USA