Burets : Overview, Uses, Function, Cleaning
Burets
– Burets, like measuring pipets, make it possible to deliver any volume up to the maximum capacity of the device.
– The precision attainable with a buret is substantially greater than the precision with a pipet.
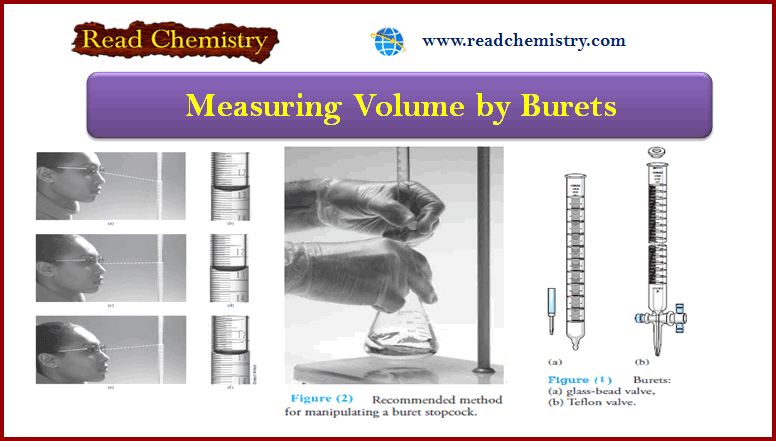
– A buret consists of a calibrated tube to hold the titrant plus a valve arrangement by which the flow of the titrant is controlled.
– This valve is the principal source of difference among burets.
– The simplest pinchcock valve consists of a close-fitting glass bead inside a short length of rubber tubing that connects the buret and its tip (see Figure 1a).
– Only when the tubing is deformed does liquid flow past the bead.
– A buret equipped with a glass stopcock for a valve relies on a lubricant between the ground glass surfaces of the stopcock and barrel for a liquid-tight seal.
– Some solutions, notably bases, cause glass stopcocks to freeze when they are in contact with ground glass for long periods.
– Therefore, glass stopcocks must be thoroughly cleaned after each use.
– Most burets made in the last several decades have Teflon® valves, which are unaffected by most common reagents and require no lubricant (see Figure 1b).

Avoiding Parallax at Reading Burets
– The top surface of a liquid confined in a narrow tube exhibits a marked curvature or meniscus.
– It is common practice to use the bottom of the meniscus as the point of reference in calibrating and using volumetric equipment.
– This minimum can be established more exactly by holding an opaque card or piece of paper behind the graduations.
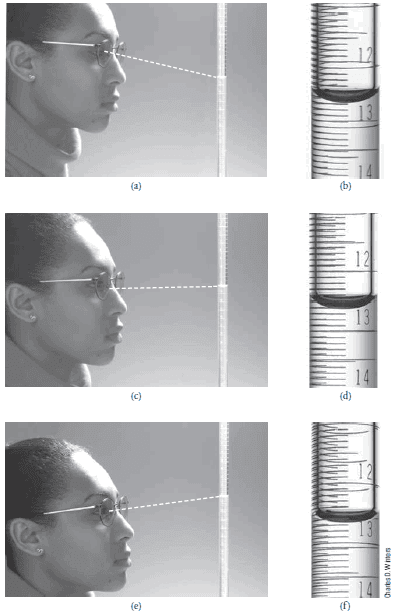
– In reading volumes, the eye must be at the level of the liquid surface to avoid an error due to parallax.
– Parallax is a condition that causes the volume to appear smaller than its actual value if the meniscus is viewed from above and larger if the meniscus is viewed from below.
– The figure below shows Reading a buret:
(a) The student reads the buret from a position above a line perpendicular to the buret and makes a reading (b) of 12.58 mL.
(c) The student reads the buret from a position along a line perpendicular to the buret and makes a reading (d) of 12.62 mL.
(e) The student reads the buret from a position below a line perpendicular to the buret and makes a reading (f ) of 12.67 mL.
– To avoid the problem of parallax, buret readings should be made consistently along a line perpendicular to the buret, as shown in (c) and (d).
Directions for Using Burets
– A buret must be scrupulously clean before it is used, and its valve must be liquid-tight.
(A) Cleaning
(1) Thoroughly clean the tube of the buret with detergent and a long brush.
(2) Rinse thoroughly with tap water and then with distilled water.
(3) Inspect for water breaks.
(4) Repeat the treatment if necessary.
(B) Lubricating a Glass Stopcock
– Carefully remove all old grease from a glass stopcock and its barrel with a paper towel and dry both parts completely.
– Lightly grease the stopcock, taking care to avoid the area adjacent to the hole.
– Insert the stopcock into the barrel and rotate it vigorously with slight inward pressure.
– A proper amount of lubricant has been used when:
(a) the area of contact between the stopcock and the barrel appears nearly transparent.
(b) the seal is liquid-tight.
(c) no grease has worked its way into the tip.
Notes
(1) Grease films that are unaffected by cleaning solution may yield such organic solvents as acetone or alcohol.
– Thorough washing with detergent should follow such treatment.
– Silicone lubricants are not recommended because contamination by such preparations is difficult—if not impossible—to remove.
(2) So long as the flow of liquid is not impeded, the fouling of a buret tip with stopcock grease is not a serious matter.
– Removal is best accomplished with organic solvents.
– A stoppage during titration can be freed by gentle warming of the tip with a lighted match.
(3) Before a buret is returned to service after reassembly, it is advisable to test for leakage.
– Simply fill the buret with water and establish that the volume reading does not change with time.
(C) Filling
(1) Make certain the stopcock is closed.
(2) Add 5 to 10 mL of the titrant, and carefully rotate the buret to wet the interior completely.
(3) Allow the liquid to drain through the tip.
(4) Repeat this procedure at least two more times.
(5) fill the buret well above the zero mark.
(6) Free the tip of air bubbles by rapidly rotating the stopcock and permitting small quantities of the titrant to pass.
– Finally, lower the level of the liquid just to or somewhat below the zero mark.
(7) Allow for drainage (≈ 1 min), and then record the initial volume reading, estimating to the nearest 0.01 mL.
(D) Titration
– Figure (2) illustrates the preferred method for manipulating a stopcock.
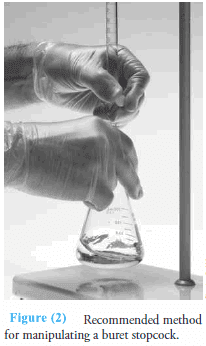
– When you position your hand as shown, your grip on the stopcock tends to keep the stopcock firmly seated.
– Be sure the tip of the buret is well within the titration flask, and introduce the titrant in increments of about 1 mL. Swirl (or stir) constantly to ensure thorough mixing.
– Decrease the volume of the increments as the titration progresses, and add titrant drop by drop as you reach the immediate vicinity of the endpoint (Note 2).
– When it appears that only a few more drops are needed to reach the endpoint, rinse the walls of the container (Note 3).
– Allow the titrant to drain from the inner wall of the buret (at least 30 seconds) after the titration.
– Then record the final volume, again to the nearest 0.01 mL.
Notes on burets
(1) When unfamiliar with a particular titration, many workers prepare an extra sample.
– No care is taken with its titration since its functions are to reveal the nature of the endpoint and to provide a rough estimate of titrant requirements.
– This deliberate sacrifice of one sample frequently results in an overall saving of time.
(2) Increments smaller than one drop can be taken by allowing a small volume of titrant to form on the tip of the buret and then touching the tip to the wall of the flask.
– This partial drop is then combined with the bulk of the liquid as in Note 3.
(3) Instead of being rinsed toward the end of a titration, the flask can be tilted and rotated so that the bulk of the liquid picks up any drops that adhere to the inner surface.
Reference: Fundamentals of analytical chemistry / Douglas A. Skoog, Donald M. West, F. James Holler, Stanley R. Crouch. (ninth edition), 2014. USA