Measuring Volume by Pipets, Burets, Volumetric Flask
– The precise measurement of volume is as important to many analytical methods as the precise measurement of mass.
(1) Units of Volume
– The unit of volume is the liter (L), defined as one cubic decimeter.
– The milliliter (mL) is one one-thousandth of a liter (0.001 L) and is used when the liter represents an inconveniently large volume unit.
– The microliter (µL) is 10-6 L or 10-3 mL.
(2) The Effect of Temperature on Volume Measurements
– The volume occupied by a given mass of liquid varies with temperature, as does the device that holds the liquid during measurement.
– Most volumetric measuring devices are made of glass, which fortunately has a small coefficient of expansion.
– Thus, variations in the volume of a glass container with temperature need not be considered in ordinary analytical work.
– The coefficient of expansion for dilute aqueous solutions (approximately 0.025%/°C) is such that a 5°C change has a measurable effect on the reliability of ordinary volumetric measurements.
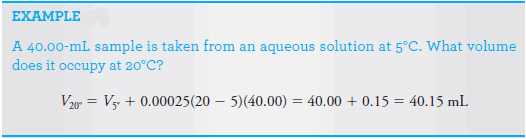
– Volumetric measurements must be referred to a standard temperature, often 20°C.
– The ambient temperature of most laboratories is usually close enough to 20°C so that there is no need for temperature corrections in volume measurements for aqueous solutions.
– In contrast, the coefficient of expansion for organic liquids may be large enough to require corrections for temperature differences of 1°C or less.
(3) Apparatus for Precisely Measuring Volume
– Volume may be measured reliably with a pipet, a buret, or a volumetric flask.
– Volumetric equipment is marked by the manufacturer to indicate not only the manner of calibration (usually TD for “to deliver” or TC for “to contain”) but also the temperature at which the calibration strictly applies.
– Pipets and burets are usually calibrated to deliver specified volumes.
– Volumetric flasks, on the other hand, are calibrated to contain a specific volume.
– Glassware types include Class A and Class B.
– Class A glassware is manufactured to the highest tolerances from Pyrex, borosilicate, or Kimax glass (see tables).
– Class B (economy ware) tolerances are about twice those of Class A.
Measuring Volume by Pipets
Pipets permit the transfer of accurately known volumes from one container to another.
Common types are shown in Figure (1), and information concerning their use is given in Table (1).
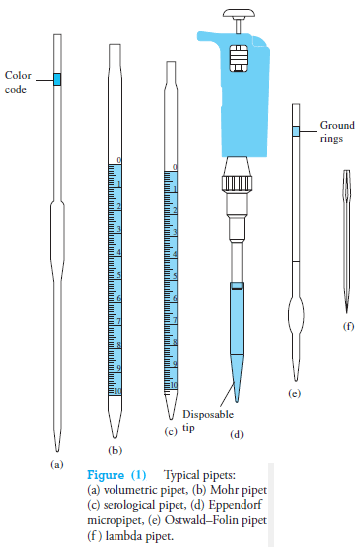

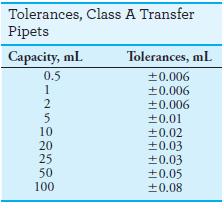
– A volumetric, or transfer, pipet (Figure 1a) delivers a single, fixed volume between 0.5 and 200 mL.
Many such pipets are color-coded by volume for convenience in identification and sorting.
Measuring pipets (Figures 1b and c) are calibrated in convenient units to permit delivery of any volume up to a maximum capacity ranging from 0.1 to 25 mL.
All volumetric and measuring pipets are first filled to a calibration mark, but the manner in which the transfer is completed depends on the particular type.
Because most liquids are attracted to glass, a small amount of liquid tends to remain in the tip after the pipet is emptied.
This residual liquid is never blown out of a volumetric pipet or from some measuring pipets, but it is blown out of other types of pipets (see Table 1).
Eppendorf micro pipets
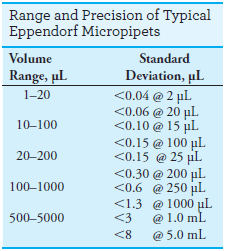
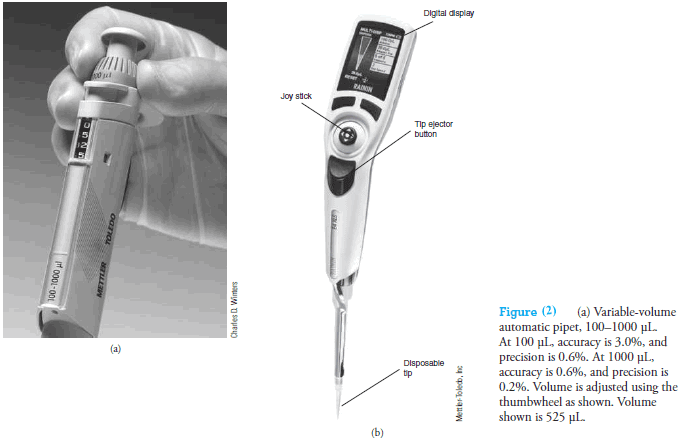
Handheld Eppendorf micro pipets (see Figure 1d and Figure 2a) deliver adjustable microliter volumes of liquid.
With these pipets, a known and adjustable volume of air is displaced from the plastic disposable tip by depressing the pushbutton on the top of the pipet to a first stop.
This button operates a springloaded piston that forces air out of the pipet.
The volume of displaced air can be varied by a locking digital micrometer adjustment located on the front or top of the device.
The plastic tip is then inserted into the liquid, and the pressure on the button is released, causing the liquid to be drawn into the tip.
The tip is then placed against the walls of the receiving vessel, and the pushbutton is again depressed to the first stop.
After 1 second, the pushbutton is depressed further to a second stop, which completely empties the tip.
The range of volumes and precision of typical pipets of this type are shown in the margin.
The accuracy and precision of automatic pipets depend somewhat on the skill and experience of the operators and thus should be calibrated for critical work.
Numerous automatic pipets are available for situations that call for the repeated delivery of a particular volume.
In addition, motorized, computer-controlled microliter pipets are now available (see Figure 2b).
These devices are programmed to function as pipets, dispensers of multiple volumes, burets, and sample dilutors.
The volume desired is entered using a joystick and buttons and is displayed on an LCD panel.
A motor-driven piston dispenses the liquid. Maximum volumes range from 10 µL to 20 mL.
Measuring Volume by Burets
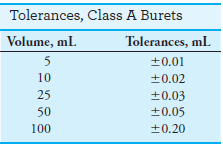
Burets, like measuring pipets, make it possible to deliver any volume up to the maximum capacity of the device.
The precision attainable with a buret is substantially greater than the precision with a pipet.
A buret consists of a calibrated tube to hold the titrant plus a valve arrangement by which the flow of titrant is controlled.
This valve is the principal source of difference among burets.
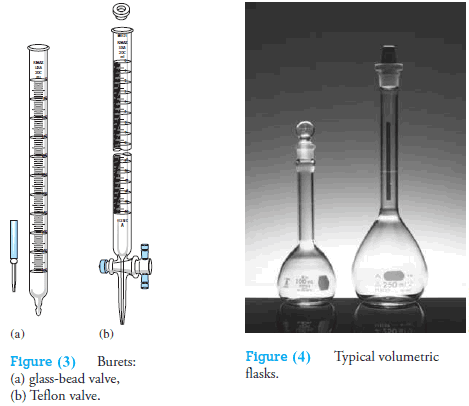
The simplest pinchcock valve consists of a close-fitting glass bead inside a short length of rubber tubing that connects the buret and its tip (see Figure 3a).
Only when the tubing is deformed does liquid flow past the bead.
A buret equipped with a glass stopcock for a valve relies on a lubricant between the ground glass surfaces of the stopcock and barrel for a liquid-tight seal.
Some solutions, notably bases, cause glass stopcocks to freeze when they are in contact with ground glass for long periods. Therefore, glass stopcocks must be thoroughly cleaned after each use.
Most burets made in the last several of decades have Teflon® valves, which are unaffected by most common reagents and require no lubricant (see Figure 3b).
Measuring Volume by Volumetric Flasks
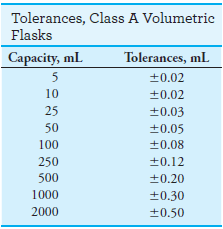
Volumetric flasks (see Figure 4) are manufactured with capacities ranging from 5 mL to 5 L and are usually calibrated to contain (TC) a specified volume when filled to a line etched on the neck.
They are used for the preparation of standard solutions and for the dilution of samples to a fixed volume prior to taking aliquots with a pipet.
Some are also calibrated on a to-deliver (TD) basis, and they are distinguished by two reference lines on the neck.
If delivery of the stated volume is desired, the flask is filled to the upper line.
(4) Using Volumetric Equipment
– Volume markings are blazed on clean volumetric equipment by the manufacturer.
– An equal degree of cleanliness is needed in the laboratory if these markings are to have their stated meanings.
– Only clean glass surfaces support a uniform film of liquid.
– Dirt or oil causes breaks in this film, so if breaks are present, the surface is almost certainly dirty.
Cleaning
A brief soaking in a warm detergent solution is usually sufficient to remove the grease and dirt responsible for water breaks.
Prolonged soaking should be avoided because a rough area or ring is likely to develop at a detergent/air interface. This ring cannot be removed and causes a film break that destroys the usefulness of the equipment.
After being cleaned, the apparatus must be thoroughly rinsed with tap water and then with three or four portions of distilled water. It is seldom necessary to dry volumetric ware.
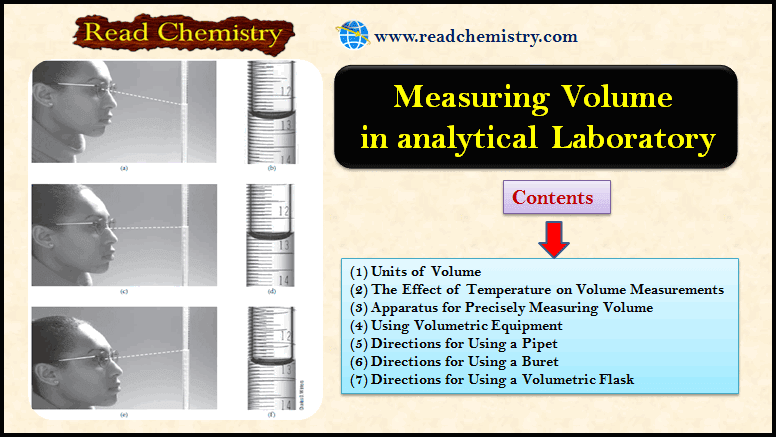
Avoiding Parallax
The top surface of a liquid confined in a narrow tube exhibits a marked curvature, or meniscus.
It is common practice to use the bottom of the meniscus as the point of reference in calibrating and using volumetric equipment.
This minimum can be established more exactly by holding an opaque card or piece of paper behind the graduations.
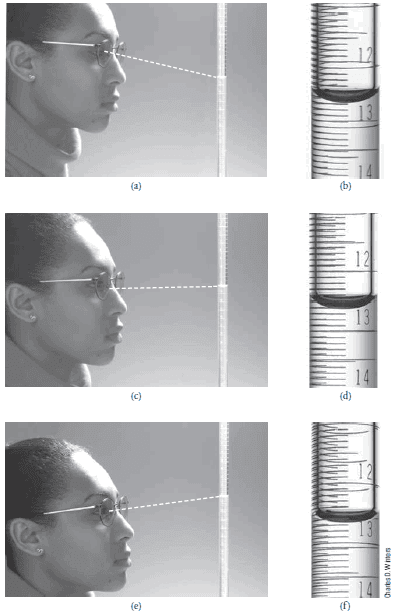
In reading volumes, the eye must be at the level of the liquid surface to avoid an error due to parallax.
Parallax is a condition that causes the volume to appear smaller than its actual value if the meniscus is viewed from above and larger if the meniscus is viewed from below.
The figure below shows Reading a buret:
(a) The student reads the buret from a position above a line perpendicular to the buret and makes a reading (b) of 12.58 mL.
(c) The student reads the buret from a position along a line perpendicular to the buret and makes a reading (d) of 12.62 mL.
(e) The student reads the buret from a position below a line perpendicular to the buret and makes a reading (f ) of 12.67 mL.
To avoid the problem of parallax, buret readings should be made consistently along a line perpendicular to the buret, as shown in (c) and (d).
(5) Directions for Using a Pipet
The following directions are appropriate specifically for volumetric pipets but can be modified for the use of other types as well.
The liquid is drawn into a pipet through the application of a slight vacuum.
Never pipet by mouth because there is the risk of accidentally ingesting the liquid being pipetted.
Instead, use a rubber suction bulb (such as the one shown at the top of the next page) or one of some similar, commercially available devices.
Many devices are commercially available for filling pipets and dispensing liquids from them.
The device shown here is offered by many suppliers and manufacturers.
Originally called the Propipette®, it is a very handy device for the task.
The Propipette consists of a rubber bulb (B) attached to three short sections of tubing.
Each section of tubing contains a small chemically inert ball (A, C, and D) that functions as a valve to permit air to flow normally in the directions indicated by the arrows.
The valves are opened by pinching with your thumb and forefinger.
The bottom of the device fits snugly on the top of a pipet.
Operation begins by opening valve A an squeezing bulb B to expel the air in the bulb.
Valve A is then closed, and valve C is opened to draw liquid into the pipet to the desired level, after which C is closed.
The liquid level is then adjusted in the pipet by carefully opening valve D, and finally, the liquid in the pipet is delivered by opening valve D completely.

Cleaning
(1) Draw the detergent solution to a level 2 to 3 cm above the calibration mark of the pipet.
(2) Drain this solution and then rinse the pipet with several portions of tap water.
(3) Inspect for film breaks, and repeat this portion of the cleaning cycle if necessary.
(4) Finally, fill the pipet with distilled water to perhaps one-third of its capacity and carefully rotate it so that the entire interior surface is wetted.
(5) Repeat this rinsing step at least twice.
Measuring an Aliquot

(1) Draw a small volume of the liquid to be sampled into the pipet (Figure 5a).
(2) thoroughly wet the entire interior surface (Figure 5b).
(3) Repeat with at least two additional portions.
(4) Then carefully fill the pipet to a level somewhat above the graduation mark. Be sure that there are no bubbles in the bulk of the liquid or foam at the surface.
(5) Touch the tip of the pipet to the wall of a glass vessel as shown in Figure 5c (not the container into which the aliquot is to be transferred),
(6)slowly allow the liquid level to drop. As the bottom of the meniscus coincides exactly with the graduation mark (Figure 5d), stop the flow.
(7) Remove the pipet from the volumetric flask, tilt it until liquid is drawn slightly up into the pipet, and wipe the tip with a lintless tissue as shown in Figure 5e.
(8) Then place the pipet tip well within the receiving vessel, and allow the liquid to drain (Figure 5f ).
(9) When free flow ceases, rest the tip against the inner wall of the receiver for a full 10 seconds (Figure 5g, h).
(10) Finally, withdraw the pipet with a rotating motion to remove any liquid adhering to the tip. The small volume remaining inside the tip of a volumetric pipet should not be blown or rinsed into the receiving vessel.
(11) Rinse the pipet thoroughly after use.
(6) Directions for Using a Buret
A buret must be scrupulously clean before it is used, and its valve must be liquid-tight.
Cleaning
(1) Thoroughly clean the tube of the buret with detergent and a long brush.
(2) Rinse thoroughly with tap water and then with distilled water.
(3) Inspect for water breaks.
(4) Repeat the treatment if necessary.
Lubricating a Glass Stopcock
Carefully remove all old grease from a glass stopcock and its barrel with a paper towel and dry both parts completely.
Lightly grease the stopcock, taking care to avoid the area adjacent to the hole.
Insert the stopcock into the barrel and rotate it vigorously with slight inward pressure.
A proper amount of lubricant has been used when:
(a) the area of contact between the stopcock and the barrel appears nearly transparent.
(b) the seal is liquid-tight.
(c) no grease has worked its way into the tip.
Notes
[1] Grease films that are unaffected by cleaning solution may yield to such organic solvents as acetone or alcohols. Thorough washing with detergent should follow such treatment. Silicone lubricants are not recommended because contamination by such preparations is difficult—if not impossible—to remove.
[2] So long as the flow of liquid is not impeded, fouling of a buret tip with stopcock grease is not a serious matter. Removal is best accomplished with organic solvents. A stoppage during titration can be freed by gentle warming of the tip with a lighted match.
[3] Before a buret is returned to service after reassembly, it is advisable to test for leakage. Simply fill the buret with water and establish that the volume reading does not change with time.
Filling
(1) Make certain the stopcock is closed.
(2) Add 5 to 10 mL of the titrant, and carefully rotate the buret to wet the interior completely.
(3) Allow the liquid to drain through the tip.
(4) Repeat this procedure at least two more times.
(5) fill the buret well above the zero mark.
(6) Free the tip of air bubbles by rapidly rotating the stopcock and permitting small quantities of the titrant to pass. Finally, lower the level of the liquid just to or somewhat below the zero mark.
(7) Allow for drainage (≈ 1 min), and then record the initial volume reading, estimating to the nearest 0.01 mL.
Titration
Figure (6) illustrates the preferred method for manipulating a stopcock.

When you position your hand as shown, your grip on the stopcock tends to keep the stopcock firmly seated.
Be sure the tip of the buret is well within the titration flask, and introduce the titrant in increments of about 1 mL. Swirl (or stir) constantly to ensure thorough mixing.
Decrease the volume of the increments as the titration progresses, and add titrant drop by drop as you reach the immediate vicinity of the endpoint (Note 2).
When it appears that only a few more drops are needed to reach the endpoint, rinse the walls of the container (Note 3).
Allow the titrant to drain from the inner wall of the buret (at least 30 seconds) after the titration. Then record the final volume, again to the nearest 0.01 mL.
Notes
[1] When unfamiliar with a particular titration, many workers prepare an extra sample. No care is taken with its titration since its functions are to reveal the nature of the endpoint and to provide a rough estimate of titrant requirements. This deliberate sacrifice of one sample frequently results in an overall saving of time.
[2] Increments smaller than one drop can be taken by allowing a small volume of titrant to form on the tip of the buret and then touching the tip to the wall of the flask. This partial drop is then combined with the bulk of the liquid as in Note 3.
[3] Instead of being rinsed toward the end of a titration, the flask can be tilted and rotated so that the bulk of the liquid picks up any drops that adhere to the inner surface.
(7) Directions for Using a Volumetric Flask
Before being put into use, volumetric flasks should be washed with detergent and thoroughly rinsed.
Only rarely do they need to be dried. If required, however, drying is best accomplished by clamping the flask in an inverted position.
Insertion of a glass tube connected to a vacuum line hastens the process.
Direct Weighing into a Volumetric Flask
The direct preparation of a standard solution requires the introduction of a known mass of solute to a volumetric flask.
The use of a powder funnel minimizes the possibility of losing solids during the transfer.
Rinse the funnel thoroughly, and collect the washings in the flask.
The foregoing procedure may be inappropriate if heating is needed to dissolve the solute.
(a) Instead, weigh the solid into a beaker or flask, and add solvent.
(b) Heat to dissolve the solute.
(c) Allow the solution to cool to room temperature.
(d) Transfer this solution quantitatively to the volumetric flask, as described in the next section.
Quantitative Transfer of Liquid to a Volumetric Flask
(1) Insert a funnel into the neck of the volumetric flask.
(2) use a stirring rod to direct the flow of liquid from the beaker into the funnel.
(3) With the stirring rod, tip off the last drop of liquid on the spout of the beaker.
(4) Rinse both the stirring rod and the interior of the beaker with distilled water and transfer the washings to the volumetric flask as before.
(5) Repeat the rinsing process at least two more times.
Diluting to the Mark
(1) After the solute has been transferred.
(2) fill the flask about half full and swirl the contents to hasten the solution.
(3) Add more solvent and again mix well.
(4) Bring the liquid level almost to the mark, and allow time for drainage (≈1 min).
(5) use a medicine dropper to make any necessary final additions of solvent (see Note below).
(6) Firmly stopper the flask, and invert it repeatedly to ensure thorough mixing.
(7) Transfer the contents to a storage bottle that either is dry or has been thoroughly rinsed with several small portions of the solution from the flask.
Notes
If, as sometimes happens, the liquid level accidentally exceeds the calibration mark, the solution can be saved by correcting for the excess volume.
Use a selfstick label to mark the location of the meniscus.
After the flask has been emptied, carefully refill to the manufacturer’s etched mark with water.
Use a buret to determine the additional volume needed to fill the flask so that the meniscus is at the gummed-label mark. This volume must be added to the nominal volume of the flask when calculating the concentration of the solution.
Reference: Fundamentals of analytical chemistry / Douglas A. Skoog, Donald M. West, F. James Holler, Stanley R. Crouch. (ninth edition) , 2014 . USA